Thứ Hai, 2 tháng 5, 2016

ARMAMENT


Bismarck Artillery Turrets
A view of the forward turrets "Anton" and "Bruno" from the forecastle. Summer of 1940.

Main Battery.
Eight 38 cm guns comprised Bismarck's main battery. The principal purpose of these guns was to destroy surface targets at sea, although they could also be used for shore bombardment and, exceptionally, against aircraft. Designed in 1934, the 38 cm SK C/34 were the most powerful guns ever mounted on a German warship. These were housed in four armoured twin turrets alphabetically arranged from forward to stern. Thus, turrets "Anton" and "Bruno" were located forward (frames 192.55 and 174.35), while turrets "Cäsar" and "Dora" were aft (frames 64.35 and 46.15). Each turret weighed 1,056 metric tons, and was supported on a roller track platform. Below there were a series of levels that extended from the upper deck down to the bottom of the ship. The turrets were especially big compared with 38 cm twin turrets of other foreign warships, and the barrels were very separated from each other, therefore reducing interferences between them. Each gun barrel could fire and be elevated independently of the other. A special characteristic of these guns was their high muzzle velocity and low shell trajectories with a short flight time, which permitted to obtain a very accurate and rapid fire. This was fully demonstrated in the morning of 24 May 1941 during the naval engagement with the British battlecruiser Hood.


Anton

Bruno

Cäsar

Dora
The ammunition supply comprised 1,004 projectiles categorised into three different types:
38cm Psgr. L/4,4 (m.Hb), Panzersprenggranate L/4,4 (mit Haube). These were Armour Piercing (AP) shells, base fused with windshield (mit Haube). The task of the armour piercing shells was to penetrate armoured plates of heavily protected targets such as battleships and detonate in the interior causing severe destruction to vital parts (boilers, magazines, etc). If used against light or unarmoured targets/surfaces, AP shells would simply penetrate these and pass through exploding beyond the target or without even detonating due to the insufficient resistance to activate the fuse. A total of 93 projectiles of this type were fired at Hood and Prince of Wales during the battle of the Denmark Strait on 24 May 1941.
38cm Spgr. L/4,5 Bdz (m.Hb), Sprenggranate L/4,5 Bodenzünder (mit Haube). These were High Explosive (HE) shells, base fused (Bodenzünder) with windshield. The penetrating capabilities of the high explosive shells with base detonating fuse were inferior than those of AP shells, however the effects of the detonation were greater since HE shells contained a larger explosive charge. This type of projectiles was utilized against relatively lightly armoured targets such as cruisers.
38cm Spgr. L/4,6 Kz (m.Hb), Sprenggranate L/4,6 Kopfzünder (mit Haube). These were High Explosive (HE) shells, nose fused (Kopfzünder) with windshield. The principal effect of high explosive shells with nose detonating fuse was the action of splinters due to their large explosive charge. Nose fused projectiles had very limited penetrating capabilities and were intended to be used against soft targets such as destroyers or merchantmen.

TypeWeightExplosive
charge
Cap weight
(without windshield)
LengthFuse
Psgr. L/4,4 (m.Hb)AP base fused800 kg18.8 kg112.50 kg1.672 mBdz 38
Spgr. L/4,5 Bdz (m.Hb)HE base fused800 kg32.6 kg69.35 kg1.710 mBdz 38
Spgr. L/4,6 Kz (m.Hb)HE nose fused800 kg64.25 kg-1.748 mKz 27

38cm 15-inch Shell
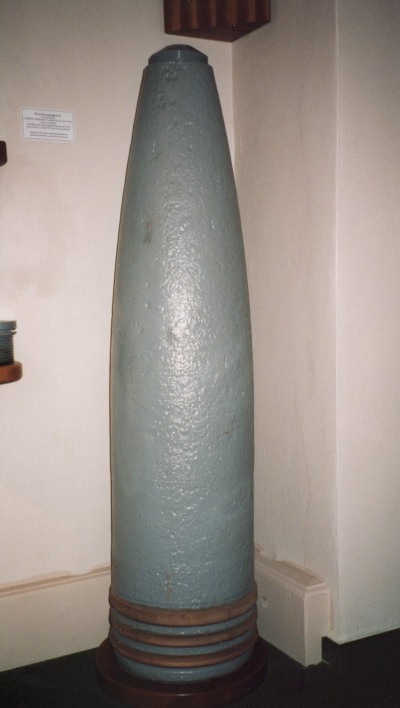
Left: A 38 cm Spgr. L/4,6 Kz projectile on display at the Wrackmuseum in Cuxhaven. Its nose has been removed. These projectiles were 1.7 m high and weighed 800 kg. Photo courtesy of Maurice Laarman.


CHARACTERISTICS

Designation:38 cm SK C/34
Number:8 (2 x 4) in four twin turrets two forward, two aft
Barrel length (L/52):19.630 meters
Bore length (L/48.5):18.405 meters
Barrel weight:110.7 metric tons
Barrel rifling:
 · Groove depth:
 · Groove width:
90 grooves, right handed twist.
4.50 mm
7.76 mm
Turret weight (without barbette):
 ·  Anton:
 ·  Bruno:
 ·  Cäsar:
 ·  Dora:

1,048 metric tons (without 10.5-m rangefinder)
1,056 metric tons
1,056 metric tons
1,056 metric tons
Elevation range:between -5.5° and +30°
Training range:
 ·  Turrets Anton and Bruno:
 ·  Turrets Cäsar and Dora:

215º - 0º - 145º
035º - 180º - 325º
Training rate:5.4°/second
Elevation rate:6°/second
Rate of fire:2.4+ rounds/minute/barrel
Maximum range:35,550 meters at 30° = 38,880 yards at 30°
Muzzle velocity:820 meters/second = 2,690 feet/second
Shell weight:800 kg = 1,764 lbs
Propellant charge weight:212 kg = 467.3 lbs
Ammunition supply:
 ·  38cm Psgr. L/4,4 (m.Hb):
 ·  38cm Spgr. L/4,5 Bdz (m.Hb):
 ·  38cm Spgr. L/4,6 Kz (m.Hb):
Total:

353 base fused AP shells
338 base fused HE shells
313 nose fused HE shells
1,004
Barrel life:200-300 rounds
Loading angle:2.5°


Secondary Battery.
The ammunition supply comprised 1,288 projectiles categorised into two different types:
15cm Spgr. L/4,5 Bdz (m.Hb), Sprenggranate L/4,5 Bodenzünder (mit haube). High Explosive (HE) shells, base fused (Bodenzünder) with windshield (mit haube).
15cm Spgr. L/4,6 Kz (m.Hb), Sprenggranate L/4,6 Kopfzünder (mit haube). High Explosive (HE) shells, nose fused (Kopfzünder) with windshield (mit haube).


Designation:15 cm SK C/28
Number:12 (2 x 6) 3 twin turrets by side
Barrel length (L/55):8.25 meters
Barrel weight:9.08 metric tons
Barrel grooves:44
Turret weight (without barbette):108 metric tons
110 metric tons (central)
Elevation range:between -10° and +40°
Training rate:8°/second
Elevation rate:9°/second
Rate of fire:8 rounds/minute/barrel
Maximum range:23,000 meters at 40° = 25,150 yards at 40°
Muzzle velocity:875 meters/second = 2,871 feet/second
Shell weight:45.3 kg = 99.8 lbs
Propellant charge weight:23.5 kg = 51.8 lbs
Ammunition supply:
 ·  15cm Spgr. L/4,5 Bdz (m.Hb):
 ·  15cm Spgr. L/4,6 Kz (m.Hb):

622 shells
666 shells
Barrel life:2,500 rounds


Heavy Anti-aircraft Battery.


Designation:10.5 cm SK C/33
Number:16 (2 x 8) in 4 double mounts by side
Barrel length (L/65):6.825 meters
Barrel weight:4.56 metric tons
Mount weight:Mounting C31: 27.350 metric tons
Mounting C37: 26.425 metric tons
Elevation range:Mounting C31: between -8° and +80°
Mounting C37: between -10° and +80°
Angular velocity:Mounting C31: vertical: 10°/sec, horizontal: 8°/sec
Mounting C37: vertical: 12°/sec, horizontal: 8.5°/sec
Rate of fire:18 rounds/minute/barrel
Maximum range:17,700 meters = 19,357 yards
Vertical range:12,500 meters at 80º
Muzzle velocity:900 meters/second = 2,952 feet/second
Shell weight:15.1 kg = 33.1 lbs
Ammunition supply:6,825 shells


Medium Anti-aircraft Battery.


Designation:3.7 cm SK C/30
Number:16 (2 x 8) in 4 double mounts by side
Barrel length (L/83):3.071 m
Elevation range:between -10º and +80º
Rate of fire:80 rounds/minute/barrel
Maximum range:6,750 meters = 7,382 yards
Muzzle velocity:1,000 meters/second = 3,281 feet/second
Shell weight:0.745 kg = 1.64 lbs
Ammunition supply:34,100 projectiles


Light Anti-aircraft Battery.

Designation:2 cm MG C/30
2 cm Flak C/38
Number:10 (1 x 10) in 10 single pedestals
8 (4 x 2) in 2 quadruple mounts
Barrel length (L/65):1.3 meters
Elevation range:+90º
Rate of fire:200 rounds/minute/barrel
Maximum range:4,800 meters = 5,249 yards
Muzzle velocity:900 meters/second = 2,952 feet/second
Shell Weight:0.132 kg = 0.291 lbs
Ammunition supply:44,000 projectiles


* To get the length of a barrel we have to multiply the thickness of the barrel by its length in caliber lengths. Therefore, a 38cm/L52 rifle would be 38 cm x 52 = 1,976 cm

Chủ Nhật, 17 tháng 4, 2016

PROTECTION


Battleships must be able to withstand repeated hits and continue fighting, so their armour expanse, distribution, and thickness are extremely important. In terms of expanse, the Bismarck devoted 19,082 mt to belt, deck, turret, underwater, and splinter armour, which amounted to 40% of its designed combat weight (47,870 mt). Only the 69,100 mt Japanese battleships of the Yamato class carried more armour (22,895 mt), ablet at a much smaller percentage (33.2%) of the ship's total weight.
Materials used.
The steels used to build the Bismarck were the end result of extensive research and development that began shortly after WWI ended. This led to the creation of armour and construction steel that was clearly superior to WWI products. In terms of specifics, the following criteria apply:
 · St 52. Construction grade steel with a tensile strength of 52-64 kg/mm², a strain of 21% and a yield point of 36-38 kg/mm².
 · KC n/A (Krupp cementite, new type). Face-hardened armour steel. This material contained 3.5-3.8% nickel, 2% chrome, 0.3% carbon, 0.3% manganese, and 0.2% molybdenum, and it was used for the side belt, turrets, barbettes, and conning towers. The 670 Brinell face-layer tapered in hardness as it extended into 40-50% of the plate's total thickness. Post WWII proving ground test indicated that KC was only slightly less resistant than British cemented armour (CA), and markedly superior to US Class A plates.
 · Wh (Wotan hart). Homogeneous armour steel with a tensile strength of 85-95 kg/mm², a strain of 20% and a yield point of 50-55 kg/mm². This material was used for the armoured decks, and, in the thickness employed aboard the Bismarck, was the equal of most foreign homogeneous plates.
 · Ww (Wotan weich). Homogeneous armour steel with a tensile strength of 65-75 kg/mm², a strain of 25% and a yield point of 38-40 kg/mm². This material was used for the longitudinal torpedo bulkheads.
Vertical Protection.
Bismarck armor belt
Kiel, March 1941. The 32cm lower main belt which covered 70% of the ship's waterline length, can be clearly seen here.
The external armoured citadel included a main KC vertical belt that was 320 mm thick, 4.8 meters wide, and 170.7 meters long. It covered 70% of the waterline (by far the greatest extent of any WWII battleship), and protected the armour deck, the upper platform deck, and part of the middle platform deck. The belt was backed with a 60 mm thick layer of teakwood that helped absorb shock damage, and it was bolted onto 16-25 mm thick side plating. The majority of the belt was located above the waterline (3.0/1.8 meters as designed, but 2.6/2.2 meters in practice), with the reasoning that shells are more likely to hit above than below the waterline. The citadel area above the main belt was armoured with 145 mm thick KC plates that protected the battery deck all the way to the armoured upper deck. This plating could also provide a protected waterplane area in the event of severe lists, decap and slow heavy APC shells, and stop light shells outright. Finally, lighter plating was mounted well forward and aft of the main belt (60 mm Wh forward and 80 mm Wh aft), and this protected nearly the entire waterplane area from splinter of light shell damage.
The belt armour was also inclined outward to increase its resistance in regions forward, abeam, and aft of the main turrets and their magazines, with the cambered sections occupying around 50% of the main belt's length. The outboard inclination was 17°, 10°, 7°, and 8-10° abreast turrets Anton, Bruno, Dora, and Cäsar respectively. This accorded additional protection while not compromising stability by compressing the bulk of the waterplane area inboard, and especially in the critical amidships area.
The hull was divided into transverse sections by 22 bulkheads that varied in thickness. The KC armoured bulkhead between sections XIX and XX (frame 202.7) was located in front of turret "Anton", and it marked the citadel's forward limit. This bulkhead extended from the upper deck down to the middle platform deck, and varied in thickness as it descended (145 mm at the level of the battery and armour decks, 220 mm thick at the upper platform deck, and 180 mm at the middle platform deck). It was partially shielded by the ship's 60 mm forward plating, which presented very poor attack angles to shells being fired from the bow quarters. Aft of turret "Dora", between sections II and III (frame 32), there was another armoured transverse bulkhead of similar characteristics, and this was reinforced by the stern's 80 mm thick splinter plating. These two transverse bulkheads, together with the longitudinal side belt and armoured upper deck, defined the external citadel (armour box) which protected the ship outboard areas. The internal raft accorded additional protection to the vitals, as we shall see when examining the horizontal protection scheme.


Horizontal protection.
The upper armour deck was 50-80 mm (Wh) thick and covered most of the ship's length (from frame 10.5 to 224). The 80 mm (Wh) platting was located from forward to aft of each pair of main turrets, around the secondary turrets, and under the control tower. A lightly protected 20 mm (St 52) thick battery deck was located 2.4 meters beneath the upper deck. The third armour deck was 10.3 meters above the keel, and featured the classic "turtle deck" arrangement with sloped edges. The amidships flat portion of the main armour deck marked the top of the internal armoured raft, and it was normally situated about one meter above the designed waterline. It was 80 mm thick over the machinery and 95 mm over the magazines. The outboard sloped portion of this deck was 110-120 mm (Wh) thick, and inclined downward at about 22° from the horizontal to where it met the lower edge of the main armour belt under the waterline. The armour deck's slopes presented attacking shells that penetrated the side armour with impact obliquities of up to 68°, and were 110 mm thick around the machinery and 120 mm thick adjacent to the magazines. Subsequent analysis indicated that the combined external citadel and internal raft could provide the vitals with relative immunity from 406 mm/45 APC shells fired at point-blank range.
The bow region was protected by a 20 mm thick fourth upper platform deck, and the stern had an armoured turtle deck of 110 mm which protected the steering gear.

Horizontal Deck Protection

Over machinery
Over magazines
Bow
Stern
Upper deck:50 mm (Wh)80 mm (Wh)50 mm (Wh)50 mm (Wh)
2nd battery deck:20 mm (St 52)20 mm (St 52)12 mm (St 52)8-12 mm (St 52)
3rd armour deck
(centre-slopes):
80-110 mm (Wh)95-120 mm (Wh)--
4th deck:--20 mm (Wh)110 mm (Wh)
Total (centre-slopes):130-160 mm (Wh)175-200 mm (Wh)70 mm (Wh)160 mm (Wh)

Turrets.
The main battery turrets were 130-360 mm KC. The barbettes were 340 mm KC over the upper deck, and 220 mm KC below it down to the third armour deck. The thickness was reduced because of the protection given by the 80 mm (Wh) upper deck and 145 mm upper citadel plating. In terms of US Class A armour, the effective resistance of the 340 mm barbette armour was 390-405 mm.

The secondary battery turrets were protected by 20-100 mm Wh plates. Their barbettes were 80 mm Wh above the upper deck. Below the upper deck the barbettes' armour could be reduced to 20 mm because the 80 mm Wh thickness of the upper deck and the 145 mm thickness of the citadel armour provided additional protection. Moreover, the secondary turrets' ammunition trunks were protected by the main side belt as they descended, and thus there was no need to extend their heavy barbette armour downward.

Command posts. Conning towers.
The forward conning tower had 350 mm KC walls and a 220 mm KC roof. The rangefinder cupola, on top of the conning tower, had 200 mm KC walls and a 100 mm KC roof. The conning tower was connected with the armour deck by a communications shaft of 85 cm in diameter and 220 mm KC walls.
The after conning tower was not so heavily protected. Its sides were 150 mm KC, the roof was 50 mm KC, and the communications shaft running to the lower decks was 70 cm in diameter and 50 mm KC thick. The aft range finder cupola had 100 mm KC walls, and a roof of 50 mm KC.
The foretop command post was lightly protected because it was so high in the foremast that heavy armour would cause stability problems. The walls were 60 mm KC and the roof was 20 mm KC. The cupola's walls were 30 mm KC, and the roof was 20 mm KC.
Bismarck conning tower
Command post
Forward
After
Foretop
Walls
350 mm
150 mm
60 mm
Roof
220 mm
50 mm
20 mm
Floor
70 mm
30 mm
20 mm

Left photo: The forward conning tower as seen from the searchlight platform. Its walls were 350 mm thick and the roof 220 mm. The range finder cupola has not yet been installed.
Underwater protection and compartmentation.
The hull was divided into 22 watertight compartments, 17 of which were located within the citadel (sections III-XIX). The area above the waterline between the armour and upper deck was divided into three large sections by 30 mm (Wh) thick port and starboard longitudinal splinter bulkheads. These were located 3-5.4 meters inboard of the side belt, and formed 51 armoured cells within the upper citadel by being transepted by transverse bulkheads. This entire array was divided in the horizontal plane by the intervening battery deck, which resulted in 102 cells. Many of these cells were subdivided by transverse and longitudinal bulkheads, with the compartmentation between the main and battery deck being in the region of 100, and above that number if one includes the compartments fore and aft of the citadel. However, the compartmentation above the armour deck far exceeds that below it.
The underwater hull formed the vast bulk of the internal armoured raft, and it was protected from torpedo and mine damage by 45 mm Ww port and starboard longitudinal bulkheads. These bulkheads were vertical instead of sloped as in the Scharnhorst Class, and could interact with the sloped armour deck above them to increase the vitals' protection against shells, although their main purpose was to limit underwater damage.
The distance between the torpedo bulkhead and the outer hull was 5.4 meters amidships (sections IX-XII), although it tapered to about 3 meters abeam turrets Anton (section XVIII) and Dora (section IV). German design philosophy attempted to avoid overly wide torpedo protection systems on the grounds that they placed a great burden on stability when flooded. Indeed, the effects of outboard flooding increase as a function of the square of a given water mass's distance from the centreline. A traditional gas expansion/counterflooding space was placed outboard of three liquid-loaded compartments which abutted the main torpedo bulkhead. The fuel oil and feed water these compartments contained, helped slow fragments as well as disperse and absorb the shock waves generated by underwater blasts. The outer void was used for counterflooding. Overall, the torpedo defence system was designed to resist a TNT charge of 250 kg (550 lbs) although its resistance actually proved to be considerably higher than that.1)
The compartmentation within each level of the internal raft was very extensive. There were 3-4 decks above the compartmented double bottom, and each of these was intricately subdivided. For example, the upper platform deck included over 250 compartments, while the middle platform deck had a nearly equal number. The lower platform deck was subdivided into over 200 compartments, and the fuel, potable water, and void spaces below this were even more finely divided. In fact, the double bottom had a depth of 1.7 meters between frames 77.3-154.6, and this provided some protection against underwater explosions from mines.
Finally, the hull was equipped with the MES (Magnetischer Eigenschutz) "magnetic self-protection system". This consisted of a series of cables that demagnetised the ship's hull in defence against magnetic mines and torpedoes.

Distance between torpedo
bulkhead and outer hull
Torpedo bulkhead
Turret A (section XVIII)3 meters45 mm (Ww)
Turret B (section XVI)3.5 meters45 mm (Ww)
Amidships (sections IX-XIII)5.4 meters45 mm (Ww)
Turret C (section VI)3.8 meters45 mm (Ww)
Turret D (section IV)3 meters45 mm (Ww)


1) According to “Technical Report No. 222-45. Loss of the Battleship Tirpitz on 12 November 1944”, the torpedo defence system onTirpitz was designed to withstand about 660 pounds (300 kg) of German hexanite.

WEIGHTS

SI Ship’s construction workshop:
SII Mechanic’s workshop:
SIII Carpenter's workshop:
SIV Painter’s workshop:
Ship's body (SI-SIV):
SI Armour plating (decks, inner bulkheads, etc):          9,165 mt
SI Hull side armour:                                                    5,149 mt
SI Bulkhead armour (at frames 10.5, 32, and 202.7):     372 mt
SI Barbette armour (4 x 38cm + 6 x 15cm):                 2,306 mt
SI Conning towers armour:                                   +       492 mt
    10,505 mt
        975 mt
        242 mt
  +    180 mt
   11,902 mt
Total armor plating (without turret armour):MI Main Machinery (without fluids, oil, and water):
MII Auxiliary Machinery (without fluids, oil, and water):
Wa Artillery (Main & secondary turrets, AA mounts, rangefinders, etc.):
Wa Turret armour:
Aircraft installation, catapult (without planes):
Mining weapons:

Empty ship (Schiff Fertig Leer):Fluids, oil, and water for MI Main machinery:
Fluids, oil, and water for MII Auxiliary machinery:
SII fluids:
Equipment (crew, provisions, nautical instruments, etc):
Ammunition:
Artillery equipment:
MI Main machinery equipment:
Ammunition and equipment for mining weapons:
Aircraft, equipment and tools:

Type Displacement (Typverdrängung):Drinking water (1.0):
Washing water (1.0) (without reserve):

Standard Displacement:1)Furnace fuel oil (0.953) (without reserve):
Propulsion fuel oil (0.852):
Lubricating oil (0.92):
Aviation gasoline:
Boiler feedwater (0.9989):

Ship fully equipped:Reserve fuel oil and washing water:

Maximum Displacement:
    17,484 mt     3,085 mt
     1,360 mt
     4,744 mt
     1,598 mt
         72 mt
  +    4.5 mt

   40,250 mt        260 mt
         62 mt
         33 mt
     1,023 mt
     1,490 mt
         97 mt
         77 mt
          6 mt
  +     15 mt

   43,313 mt        155 mt
  +    510 mt

   43,978 mt     6,194 mt
        527 mt
        275 mt
         34 mt
  +    752 mt

   51,760 mt +  1,726 mt

   53,486 mt


1) The standard displacement of a warship was defined in the Washington Naval Treaty of 1922 as the displacement of the ship complete, fully manned, engined, and equipped ready for sea, including all armament and ammunition, equipment, outfit, provisions and fresh water for crew, miscellaneous stores and implements of every description that are intended to be carried in war, but without fuel or reserve feed water on board.

Thứ Ba, 12 tháng 4, 2016

GENERAL CHARACTERISTICS


Battleship Bismarck

Laid down:
1 July 1936
Launched:
14 February 1939
Commissioned:
24 August 1940
Construction cost:
RM. 196.8 million
Displacement:
 ·  Empty ship:
 ·  Standard:
 ·  Construction:
 ·  Full load:
 ·  Maximum:

40,250 metric tons
43,978 metric tons
47,870 metric tons
51,760 metric tons
53,486 metric tons
Dimensions:
 ·  Waterline length:
 ·  Overall length:
 ·  Beam:
 ·  Standard draught:
 ·  Maximum draught:
 ·  Freeboard amidships:
 ·  Height of hull sides (depth):
 ·  Waterplane area:

241.55 meters
251 meters
36 meters
9.33 meters
10.55 meters
between 4.45 - 5.67 meters
15 meters
5,740 m²
Armour Protection:
 ·  Upper belt:
 ·  Main belt:
 ·  Main battery turrets:
 ·  Secondary battery turrets:
 ·  Upper deck:
 ·  Third armour deck:
 ·  Conning tower:
 ·  Torpedo bulkhead:
 ·  Protected length 1):
 ·  PC/TC 2):
 ·  Armour's weight:

145 mm
320 mm
130-360 mm
40-100 mm
50-80 mm
80-120 mm
220-350 mm
45 mm
70% (170.7 meters)
17/22
19,082 metric tons
Armament:
 ·  Main:
 ·  Secondary:
 ·  Anti-aircraft:

8 x 38cm/L52
12 x 15cm/L55
16 x 10.5cm/L65
16 x 3.7cm/L83
18 x 2cm/L65
Fire control:
5 x 10.5-m base rangefinders
1 x 7-m base rangefinder
2 x 6.5-m base rangefinders
4 x 4-m Type SL-8 rangefinders
2 x 3-m rangefinders
Radar Equipment:
3 x FuMO 23
Propulsion plant:
12 Wagner boilers
Three Blohm & Voss turbine sets
150,170 hp (maximum obtained)
Speed:
30.12 knots (maximum obtained)
Endurance:
9,280 nautical miles at 16 knots
8,900 nautical miles at 17 knots
8,525 nautical miles at 19 knots
6,640 nautical miles at 24 knots
4,500 nautical miles at 28 knots
Fuel oil capacity:
7,400 metric tons
Aircraft:
4 x Arado Ar 196
Crew:
2,200+
Hull coefficients & ratios:
· Ratio length/beam:
· Ratio beam/draught:
· Ratio draught/depth:
· Ratio length/depth:
· Block coefficient:3)
· Midship coefficient:4)
· Waterplane coefficient:5)
· Prismatic coefficient:6)
· Metacentric height (GM):

6.71
3.85
0.62
16.10
0.55
0.97
0.66
0.56
4.00 meters
1) Protected length: Part of the ship within the citadel with the maximum amount of armour and underwater protection.
2) PC/TC: Protected compartments / Total compartments. The protected compartments are those within the citadel.
3) The block coefficient (CB) is the ratio of the underwater hull volume of a ship at a particular draft to the volume of a rectangular prism (the circumscribing prism) of the same length, breadth, and draught as the ship. CB = V/(L x B x T)
Bismarck block coefficient is calculated as follows: CB = 45,000 mt / (241.55 m x 36 m x 9.3 m) = 0.55

4) The midship section coefficient (CM) is the ratio of the area of the underwater midship section (Am) of a ship at a particular draft to the area of a rectangle (the circumscribing rectangle) of the same breadth and draught as the ship. CM = Am/(B x T)
Bismarck midship section coefficient is calculated as follows: CM = 305 m² / (36 m x 8.7 m) = 0.97

5) The waterplane coefficient (CWP) is the ratio of the area of a ship’s waterplane (AWP) to the area of a rectangle (the circumscribing rectangle) of the same length and breadth as the ship. CWP = AWP/(L x B)
Bismarck waterplane coefficient is calculated as follows: CWP = 5,740 m² / (241.55 m x 36 m) = 0.66

6) The longitudinal prismatic coefficient (CP) is the ratio of the underwater hull volume of a ship to the volume of a prism with length equal to the ship’s and cross-section area identical to the midship section. In other words, the prismatic coefficient is equal to the block coefficient (CB) divided by the midship section coefficient (CM). CP = V/(Am x L) = CB/CM
Bismarck prismatic coefficient is calculated as follows: CP = 0.55 / 0.97 = 0.56

* * * * * * * * * * * * * * * * * * * * * * * * * * * * * * * * * * * * * * * * * * * * * * * * * * * * * * * * * * * * * * * * * *

Characteristics of the Bismarck and other British capital ships in May 1941.

Ship:
Bismarck
Hood
King George V
Rodney
Laid down:
1 July 1936
1 September 1916
1 January 1937
28 December 1922
Launched:
14 February 1939
22 August 1918
21 February 1939
17 December 1925
Commissioned:
24 August 1940
29 March 1920
11 December 1940
November 1927
Displacement:
- Standard:
- Full load:

43,900 mt
51,700 mt

43,144 mt
49,136 mt

38,600 mt
44,400 mt

33,700 mt
41,000 mt
Dimensions:
- Length overall:
- Beam:
- Maximum draft:

251 m
36 m
10.55 m

262.2 m
32.2 m
10.1 m

227.1 m
31.9 m
10.3 m

216.4 m
32.31 m
12.2 m
Armour:
- Main belt:
- Turrets:
- Upper deck:
- Armour deck:
- Protected length:
- PC/TC:
- Armour's weight:

320 mm
130-360 mm
50-80 mm
80-120 mm
70 %
17/22
19,082 mt

305 mm
127-381 mm
32 mm
51 mm
65 %
12/19
13,650 mt

348-374 mm
150-324 mm
-
124-150 mm
59 %
10/21
12,612 mt

356 mm
184-406 mm
-
159 mm
53 %
9/17?
14,250 mt
Armament:
- Main:
- Secondary:
- Anti-aircraft:


8 x 380 mm L/52
12 x 150 mm L/55
16 x 105 mm
16 x 37 mm
18 x 20 mm

8 x 381 mm L/42
-
14 x 102 mm
24 x 40 mm
16 x 12.7 mm
5 x 20 rockets

10 x 356 mm L/45
16 x 133 mm L/50
32 x 40 mm
4 x 20 rockets


9 x 406 mm L/45
12 x 152 mm L/50
6 x 120 mm
24 x 40 mm

Radar:
3 x FuMO 23
1 x Type 284
1 x Type 279M
1 x Type 284
1 x Type 281
1 x Type 279 ?
Aircraft:
4 x Arado Ar 196
-
4 x Walrus
1 x Walrus
Machinery:
12 boilers
3 sets of turbines
150,170 hp
24 boilers
4 sets of turbines
151,280 hp
8 boilers
4 sets of turbines
113,000 hp
8 boilers
2 sets of turbines
45,000 hp
Speed:
30 knots
29-30 knots
28-29 knots
21 knots
Endurance:
8,525 nm
at 19 knots
5,950 nm
at 18 knots
4,750 nm
at 18 knots
7,000 nm
at 16 knots
Fuel capacity:
7,400 mt
4,064 mt
4,000 mt
3,805 mt
Crew:
2,200+
1,417
1,600
1,300

* * * * * * * * * * * * * * * * * * * * * * * * * * * * * * * * * * * * * * * * * * * * * * * * * * * * * * * * * *

Characteristics of the Bismarck and other battleships of the time in 1941.

Ship:
Bismarck
Richelieu
Vittorio Veneto
North Carolina
Laid down:
1 July 1936
22 October 1935
28 October 1934
27 October 1937
Launched:
14 February1939
17 January 1939
25 July 1937
13 June 1940
Commissioned:
24 August 1940
15 June 1940
1 May 1940
9 April 1941
Displacement:
- Standard:
- Full load:

43,900 mt
51,700 mt

38,450 mt
45,438 mt

41,167 mt
45,752 mt

37,178 mt
45,519 mt
Dimensions:
- Length overall:
- Beam:
- Maximum draft:

251 m
36 m
10.55 m

247.8 m
33.08 m
9.9 m

237.8 m
32.95 m
10.44 m

222.1 m
33 m
10.8 m
Armour:
- Main Belt:
- Turrets:
- Upper deck:
- Armour deck:
- Protected length:
- PC/TC:
- Armour's weight:

320 mm
130-360 mm
50-80 mm
80-120 mm
70 %
17/22
19,082 mt

327 mm
170-430 mm
24 mm
150-170 + 40 mm
54 %
10/21
16,400 mt

350 mm
130-380 mm
45 mm
112 mm
55 %
8/18
13,545 mt

305 mm
178-406 mm
37 mm
104 + 36 mm
60 %
9/18?
15,087 mt
Armament:
- Main:
- Secondary:
- Anti-aircraft:


8 x 380 mm L/52
12 x 150 mm L/55
16 x 105 mm
16 x 37 mm
18 x 20 mm

8 x 380 mm L/45
9 x 152 mm L/55
12 x 100 mm
12 x 37 mm
32 x 13.2 mm

9 x 381 mm L/50
12 x 152 mm L/55
12 x 90 mm
20 x 37 mm
20 x 20 mm

9 x 406 mm L/45
-
20 x 127 mm L/38
16 x 28 mm
12 x 12.7 mm
Aircraft:
4 x Arado Ar 196
3 x Loire 130
2-3 Romeo Ro 43
2 x Kingfisher
Machinery:
12 boilers
3 sets of turbines
150,170 hp
6 boilers
4 sets of turbines
179,000 hp
8 boilers
4 sets of turbines
140,000 hp
8 boilers
4 sets of turbines
122,000 hp
Speed:
30 knots
32.6 knots
30 knots
28 knots
Endurance:
8,525 nm
at 19 knots
9,500 nm
at 15 knots
4,584 nm
at 16 knots
17,450 nm
at 15 knots
Fuel capacity:
7,400 mt
6,000 mt
4,000 mt
6,300 mt
Crew:
2,200+
approx 1,600
1,920
2,300

* * * * * * * * * * * * * * * * * * * * * * * * * * * * * * * * * * * * * * * * * * * * * * * * * * * * * * * * * *

Characteristics of Bismarck's sister ship and the last generation of battleships.

Ship:
Tirpitz (1944)
Yamato
Iowa
Vanguard
Laid down:
2 November 1936
4 November 1937
27 June 1940
2 October 1941
Launched:
1 April 1939
8 August 1940
27 August 1942
30 November 1944
Commissioned:
25 February 1941
16 December 1941
23 February 1943
9 August 1946
Displacement:
- Standard:
- Full load:

43,900 mt
51,700 mt

64,000 mt
72,800 mt

48,110 mt
57,500 mt

46,200 mt
51,400 mt
Dimensions:
- Length overall:
- Beam:
- Maximum draft:

253.6 m
36 m
10.61 m

263 m
37 m
10.86 m

270.4 m
32.9 m
11.3 m

249 m
32.8 m
10.5 m
Armour:
- Main Belt:
- Turrets:
- Upper deck:
- Armour deck:
- Protected length:
- PC/TC:
- Armour's weight:

315 mm
130-360 mm
50-80 mm
80-120 mm
70 %
17/22
19,082 mt

410 mm
270-650 mm
-
200-230 mm
60 %
?
21,200 mt

307 mm
185-432 mm
38 mm
121 + 32 mm
60 %
?
18,700 mt

330-355 mm
152-330 mm
-
127-152 mm
58 %
?
? mt
Armament:
- Main:
- Secondary:
- Anti-aircraft:


8 x 380 mm L/52
12 x 150 mm L/55
16 x 105 mm
16 x 37 mm
78 x 20 mm

9 x 459 mm L/45
12 x 155 mm L/60
12 x 127 mm
24 x 25 mm
4 x 13.2 mm

9 x 406 mm L/50
20 x 127 mm L/38
80 x 40 mm
49 x 20 mm
-

8 x 381 mm L/42
16 x 133 mm L/50
73 x 40 mm
-
-
Aircraft:
4 x Arado Ar 196
7 x Mitsubishi F1M
2-3 Kingfisher
-
Machinery:
12 boilers
3 sets of turbines
163,024 hp
12 boilers
4 sets of turbines
153,000 hp
8 boilers
4 sets of turbines
212,000 hp
8 boilers
4 sets of turbines
130,000 hp
Speed:
30.8 knots
27-8 knots
33 knots
30 knots
Endurance:
8,870 nm
at 19 knots
7,200 nm
at 16 knots
18,000 nm
at 12 knots
9,000 nm
at 20 knots
Fuel capacity:
7,780 mt
6,300 mt
7,600 mt
7,000 mt
Crew:
2,600
3,300
2,700
2,000+


mt = metric tons, 1 mt = 1,000 kilograms
nm = nautical miles, 1 nm = 1,852 meters = 2,025 yards

1 knot = 1 nm/hour


source : http://www.kbismarck.com/

Thứ Bảy, 9 tháng 4, 2016

SAM - the CAT :)

The black and white cat was named Oscar and then became known as Unsinkable Sam started his “career” in the fleet of the Nazi regime, the Kriegsmarine, and ended it in the Royal Navy. He was onboard Bismarck, the HMS Cossack and the HMS Ark Royal, but here comes the cool part: the other thing that all those ships have in common is that they all three sank, and Sam survived them all.

Bismarck sinking


Bismarck. Image via Wikipedia.
Bismarck was the first of two Bismarck-class battleships built for Nazi Germany’s Kriegsmarine. Named after Chancellor Otto von Bismarck, the battleship was launched on 14 February 1939, measured 241 meters in length and weighed 41,700 tons. Bismarck was involved in a battle with The Prince of Wales, an allied battleship, was badly damaged, and became unmanoeuvrable.
Ultimately, the ship was sank, and only 118 from its crew of over 2,200 survived. Hours later, Oskar was found floating on a board and picked from the water, the only survivor to be rescued by the homeward-bound British destroyer HMS Cossack. The crew didn’t know the cat’s name and they named him Oscar. It was then that Unsinkable Sam switched sides from the Nazi to the Allied forces, but his luck didn’t change so much…

HMS Cossack sinking…


HMS Cossack
The cat served on board Cossack for the next few months as the ship carried out convoy escort duties in the Mediterranean and north Atlantic. Things went pretty smoothly for that period, but ultimately, the destroyer was badly damaged by a torpedo, and 139 of its crew were killed.
On 27 October 1941, a day after the tow was slipped, Cossack sank to the west of Gibraltar, and Oscar was found clinging to a piece of plank; he made it and was brought to the shore establishment in Gibraltar. When they learned what happened, British officers changed his name to Unsinkable Sam – a fitting name for a cat that survived the sinking of two warships. But his adventure wasn’t over quite yet…

…and HMS Ark Royal sinking…


Unsinkable Sam was then adopted by the crew of the HMS Ark Royal – ironically, a ship that was instrumental in sinking the Bismarck. Ark Royal survived several near misses and gained a reputation as a ‘lucky ship’. The Germans incorrectly reported her as sunk on multiple occasions – the right place for Sam to be. But luck didn’t last, and when returning from Malta on 14 November 1941, this ship too was torpedoed, this time by an U-boat.
This time, Sam was found clinging to a floating plank by a motor launch, and described as “angry but quite unharmed”. But by this time, Sam had enough. He was transferred to a job on land and spent his days hunting mice in the building of the Governor General in Gibraltar. Eventually, he was sent back to the UK where he remained at a ‘Home for Sailors’ in Belfast until the end of his earthly days.

Unsinkable Legacy

Painting of Unsinkable Sam.
Some people question the veridicity of Sam’s story, classing it as a ‘sea story’. Surviving the Bismarck sinking seems especially unlikely, as salvaging the crew was done in desperate conditions, but even so, I could imagine a British soldier taking the time to save the cat.


I don’t know if the story is true or not, but we’ll just take it as it is for now. Take it as a story, take it as a legend or a myth – Unsinkable Sam survived the destruction of three warship in World War II and lived happily until 1955. A pastel portrait of Sam (titled “Oscar, the Bismarck’s Cat”) by the artist Georgina Shaw-Baker is in the possession of the National Maritime Museum, Greenwich. Oh, and as for Sam’s legacy – it goes to show that even in the most dire of circumstances, even as everything around you is crumbling down, you can still cling on to a piece of wood, get rescued, and move on to another ship and start over again. Or it goes to show that cats really do have 9 lives.

THE SHIPS INVOLVED


During the course of Operation Rheinübung almost 100 ships of all kinds were deployed to operate with, against or because of the Bismarck. The following table lists all the ships that had something to do with it, and got involved in one or another way.

Battleships
Carriers
Heavy
Cruisers
Light
Cruisers
Destroyers
Submarines
Others
GermanBismarck
-
Prinz Eugen
-
Z-23
Z-16 Friedrich Eckoldt
Z-10 Hans Lody
U-93, U-43
U-46, U-557
U-66, U-94
U-556, U-108
U-98, U-48
U-74, U-552
Sachsenwald
BritishKing George V
Prince of Wales
Ramillies
Revenge
Rodney
Repulse
Hood
Renown
Victorious
Ark Royal
Suffolk
Norfolk
Dorsetshire
London
Kenya
Galatea
Aurora
Neptune
Hermione
Edinburgh
Manchester
Arethusa
Birmingham
Sheffield
Achates, Antelope
Anthony, Echo
Somali, Eskimo
Nestor, Jupiter
Electra, Icarus
Active, Inglefield
Intrepid, Assiniboine
Saguenay, Lance
Legion, Columbia
Punjabi, Winsor
Mashona, Cossack
Sikh, Zulu, Maori
Piorun (Polish), Tartar
Faulknor, Foresight
Forester, Foxhound,
Fury, Hesperus
H-44
Minerve
P-31
Sealion
Seawolf
Tigris
Sturgeon
Pandora
-
Swedish
-
-
-
Gotland
-
-
-
Spanish
-
-
Canarias
-
-
-
-
American
-
-
-
-
-
-
Modoc


LINE DRAWINGS
(Drawings made by Manuel P. González López)
All the ship drawings on this page are displayed in the same scale in order to facilitate comparisons among them. Click on to see enlarged versions.


Click to Enlarge

Click to Enlarge


Click to Enlarge


Click to Enlarge


Click to Enlarge


Click to Enlarge


Click to Enlarge


Click to Enlarge


Click to Enlarge


Back to Main


source : http://www.kbismarck.com/

Thứ Sáu, 8 tháng 4, 2016

THE LAST STAND OF THE BISMARCK


By José M. Rico
The Final Battle (A desperate fight against impossible odds).
The sea ran high with the wind from the north-west at force 8 (34-40 knots). On board the Bismarck, the atmosphere on the bridge was tense, and they knew it was only a matter of time before the British engaged them with heavy ships. The German battleship was steering against the wind at seven knots. The flooding in the stern compartments had somehow reduced the bow trim although the ship had a slight list to port. At 0833, King George V and Rodney altered their course to 110º, and ten minutes later at 0843, they sighted theBismarck at 23,000 meters (25,150 yards).

Balance of Forces

Ship:
Bismarck
Rodney
King George V
Norfolk
Dorsetshire
Displacement:
51,700 mt
41,000 mt
44,400 mt
13,400 mt
13,400 mt
Armament:
 ·  Main:
 ·  Secondary:

8 x 38 cm
12 x 15 cm

9 x 40.6 cm
12 x 15.2 cm

10 x 35.6 cm
16 x 13.3 cm

8 x 20.3 cm
-

8 x 20.3 cm
-
Armour:
 ·  Belt:
 ·  Turrets:
 ·  Upper deck:
 ·  Armour deck:

320 mm
130-360 mm
50-80 mm
80-120 mm

356 mm
184-406 mm
-
159 mm

348-374 mm
150-324 mm
-
124-150 mm

25-50 mm
25 mm
-
35 mm

25-50 mm
25 mm
-
35 mm
Speed:
30 knots*
21 knots
28 knots
32 knots
32 knots
Bismarck's speed is irrelevant in this case as she was only doing seven knots during the final battle.
The Rodney opened fire at 0847, followed by the King George V one minute later. The distance at this time was about 20,000 meters (21,870 yards). The Bismarck returned fire at 0849 with the forward turrets "Anton" and "Bruno" against the Rodney. Turrets “Caesar” and “Dora” could not be trained at this time. On the contrary, the Rodney had all her nine guns positioned forward and the King George V added six more. So, the initial stage of this engagement consisted of an exchange between four German guns and fifteen British. TheBismarck was totally outgunned. Moreover, at 0854, the Norfolk joined the battle with her eight 20.3 cm guns, and at 0858 the secondary battery of Rodney joined the action. Nevertheless, just at this time the Bismarckmanaged to straddle Rodney.
Bismarck under fire
Bismarck's final battle has just begun and the first British shells fall near the German battleship on the morning of 27 May 1941.

Finally, at 0902, the Bismarck was hit by several shells that struck the forecastle, foremast and disabled the foretop rangefinder. At 0904, the Dorsetshire (Captain Benjamin C. S. Martin) which had just arrived, also opened fire. Two battleships and two heavy cruisers were firing against the Bismarck. At 0908, the forward range finder and turrets "Anton" and "Bruno" were put out of action. Bismarck's fire control was, therefore, shifted to the after command post. From there, the Fourth Artillery Officer (IV.A.O.), Lieutenant Müllenheim-Rechberg directed four salvoes against the King George V. But at about 0913, just as he got the range, his station was also put out of action by a 35.6 cm shell that destroyed the cupola. The after turrets then proceeded to fire under local control at Rodney which, in the meantime, had launched six torpedoes atBismarck, none of them hit. At 0921, turret "Dora" was put out of action after one of its own shells exploded inside the right barrel. At 0927, turret "Anton" or "Bruno" surprisingly fired one last salvo. Four minutes later, at 0931 turret "Cäsar" fired its last salvo. Only a few secondary guns were still in action, but these were soon to be silenced, too, by the enormous avalanche of British fire. At this time, Captain Lindemann, gave the order to scuttle and abandon ship.
Once the Bismarck lost her fighting capability, Rodney got closer, and from distances between 2,500 and 4,000 meters continued firing with her nine 40.6 cm guns against both sides of the German battleship. The hits continued. At about 0940, the rear wall of turret "Bruno" blew out and the turret caught on fire. At 0956, the Rodney launched two more torpedoes from 2,700 meters with one possible hit scored on the portside. From this point blank range it was virtually impossible to miss a shot, and shell by shell hit the Bismarckwhich amazingly was still afloat. Soon after 1000, the Norfolk launched four torpedoes from about 3,600 meters with one possible hit to the starboard side. The destruction aboard the Bismarck was complete, and men had begun jumping overboard. All guns were out of action, their barrels pointing in different directions at odd angles. The funnel and superstructure were holed in many places. The port forward hangar was demolished. In some places the decks looked like a slaughterhouse. Ironically, the main mast was still standing with the battle flag flaying with the wind. The Rodney ceased fire at 1016, and Tovey, short of fuel, was forced to leave the battlefield.
Rodney engaging the Bismarck
The battleship Rodney engaging the Bismarck on the morning of 27 May, as seen from the King George V.

The Sinking of the Bismarck.
At 0920, the Ark Royal had launched twelve Swordfish in order to attack Bismarck. The Swordfish striking force appeared on the scene at about 1015, but due to the heavy fire from the British warships stayed away. At first, the King George V mistook them by German aircraft, and even opened fire with her anti-aircraft battery, but fortunately no planes were hit. At 1020, the Dorsetshire closed the range and fired two 21 inch MK VII torpedoes1 from 3,000 meters at the starboard side of the Bismarck. Both of them hit, but no appreciable effect was observed. Then, the British heavy cruiser turned around, and at 1036 fired another torpedo from 2,200 meters against Bismarck's port side that also hit. The Swordfish circling over the area were privileged witnesses to this unfolding drama. By this time the German battleship had a heavy list to port, with the water reaching the upper deck. The port secondary battery turrets were almost submerged. Finally, the Bismarck capsized and sank at 1039 in the approximate position of 48º 10' North, 16º 12' West.
Bismarck Sinking
The Bismarck about to capsize sinking by the stern as seen from the cruiser Dorsetshire between 1036-1038 hours on 27 May.

Almost two hours had elapsed since the battle had begun, and the Bismarck had shown a formidable capacity of resistance. The British first struck Bismarck at 0902, and ceased fire around 1016. For 74 minutes, the Bismarck received a continuous hammering that no other warship could have taken. We need not forget that the Hood sank six minutes after the first German shells were fired only three days earlier. Moreover, neither the main belt nor the armour deck seemed to have been penetrated during the combat2, and in the end it was her own crew who scuttled the ship. During this last engagement 2,876 shells were fired at the Bismarck. They are itemised as follows:

    380 of 40.6 cm from Rodney
    339 of 35.6 cm from King George V
    527 of 20.3 cm from Norfolk
    254 of 20.3 cm from Dorsetshire
    716 of 15.2 cm from Rodney
    660 of 13.3 cm from King George V
It will never be known how many of them did actually hit (200, 300, maybe more?), but taking into account the short distances in the last phase of the action, it is assumed that many shells hit.
At 1100, only 20 minutes after the sinking, Winston Churchill informed the House of Commons gathered at Church House about the operations against Bismarck: "This morning shortly after day-break, the Bismarckvirtually immobilized, without help, was attacked by British battleships that pursued her. I don't know the result of this action. It seems however, that Bismarck was not sunk by gunfire, and now will be sunk by torpedoes. It is believed that this is happening right now. Great as is our loss in the Hood, the Bismarck must be regarded as the most powerful enemy battleship, as she is the newest enemy battleship and the striking of her from the German Navy is a very definite simplification of the task of maintaining effective mastery of the Northern sea and maintenance of the Northern blockade." Mr. Churchill had just sat down when he was given a note, the Prime Minister rose again and said: "I have just received news that the Bismarck is sunk." The cheers were loud and long.

Survivors.
Around 800 sailors managed to abandon the Bismarck before she sank. The rest of the crew, many of them still alive sank with the battleship. An hour later, the Dorsetshire picked up 86 sailors and the Maori another 25. The temperature of the water was 13º C. The British did not recover more men because they claimed there were U-boats in the area. Hours later, the U-74 (Lieutenant Eitel-Friedrich Kentrat) rescued three more sailors. They were Herbert Manthey, Otto Höntzsch, and Georg Herzog. The next day (28th), the German weather observation ship Sachsenwald (Lieutenant Wilhelm Schütte) found two more, Otto Maus and Walter Lorenzen. Meanwhile, the Spanish heavy cruiser Canarias (Captain Benigno González-Aller) had left the port of El Ferrol at 1140 on 27 May in an attempt to rescue some survivors from the Bismarck. On 30 May, after a brief meeting with the Sachsenwald the Canarias found two dead bodies floating in the sea which were pulled up aboard. These were Walter Gaszczak and Heinrich Neuschwander. At 1000 on the next day (31st), they were given a naval burial service and their bodies were committed to the deep. In the end, out of a crew of more than 2,200 officers, non-commissioned officers and men only 115 survived.
Ceremony aboard Canarias
Ceremony aboard the Canarias for the Bismarck's dead.


Following the sinking of the Bismarck, German aircraft had been sent to look for Admiral Tovey’s force that had run low on fuel and was on its way back home. On 28 May, the destroyers Tartar and Mashona were attacked by German bombers. Mashona was hit by a bomb on her port side and sank with the loss of 46 men. The Tartar rescued about 170 men, including Mashona’s commander William H. Selby. The rest of the British fleet arrived safely in port.
Operation Rheinübung: Final Observations.
Although considered a fine commander, Admiral Lütjens has been unjustly criticised for some of the decisions made during Operation Rheinübung. Today with the advantage of knowing the final outcome of battle, it is easy to conduct a deep examination of the operations and say what Lütjens should or shouldn't have done. But one must put oneself in the German Admiral’s place and try to understand the difficulties that affected his decisions and the time and circunmstances in which they were made. Nevertheless, the truth is that both German and British committed a series of "reproachable mistakes" that made this story even more dramatic and interesting. If a single one of those mistakes had not been made, the course of the operations could have developed in a completely different way and the outcome of the battle could have been quite different. As Karel Stepanek playing Admiral Lütjens in the 1960 movie "Sink the Bismarck" says: "We have a most interesting chess game here".
From the operative point of view, Operation Rheinübung was a failure since its first stages, since as early as 20 May, the German battle group had been already detected in the Kattegat. The British demonstrated that they had heavily improved their vigilance, and successfully signalled Bismarck's movements from her first arrival in Norwegian waters. The Germans, on the other hand, suffered from inadequate military intelligence and a lack of effective cooperation with the U-boat arm. Despite all this, the Bismarck almost escaped, and she would certainly have done so, if it were not for that fatal torpedo hit on the stern. If there is one thing that can not be reproached is the conduct of her crew which was in every way exemplary.
For the German Navy the sinking of the battleship Bismarck was probably the heaviest single blow of the war. Nevertheless, the Kriegsmarine still had considerable striking power and was far from being defeated as the year 1942 proved; however, but the loss of the Bismarck marked a turning point in the war on Allied merchant shipping. Not only because of the loss of the battleship itself, but because the consequences that it brought. Shortly after Operation Rheinübung, the Germans abandoned the use of heavy surface warships for raiding purposes in the Atlantic. From then on, only the auxiliary cruisers remained engaged against enemy merchant shipping, but even their use proved difficult by the end of 1941, and therefore the Germans concentrated their efforts in the U-boat war. U-boats would still bring important successes, but they, too, were eventually defeated in May 1943 with the loss of 41 units, in what it can be considered as the other turning point in the Battle of the Atlantic.
The aircraft carrier had revealed itself as a decisive weapon and soon was to replace the battleship as the ultimate warship. This was confirmed six months later during the Japanese attack on Pearl Harbour, and during the Battle of the Coral Sea, the first true aero-naval battle in history between two carrier forces. Today, now in the 21st century, the battleship era is long gone, but the story of the Bismarck and her brave crew still fascinates thousands of people and her legend is still very much alive.


Footnotes:
1. The MK VII torpedo weighted 1,409 kg (3,106 lbs) and had a warhead of 336 kg (740 lbs) TNT.

2. The most recent survey of Bismarck’s wreck showed only two complete penetrations in the lower 320 mm main belt, both on the starboard side. These penetrations must be credited to Rodney’s 40.6 cm guns since the King George V always kept herself onBismarck’s portside throughout the battle. 
source : http://www.kbismarck.com/